|
This page is dedicated to the Texas Instruments TI-59 programmable pocket calculator - for me it is, was and will always be the best programmable pocket calculator ever and not even HP developed anything comparable to it (please note, this is my oppinion - I know there are many HP calculator enthusiasts out there who are sure that there is nothing which can beat an HP calculator - it is just a matter of personal preference :-) ). The TI-59 was developed by Texas Instruments and introduced to the market on May 24th, 1977, so this year (2007) is the 30th anniversary of this wonderful gadget.
In the following I will try to give some background information concerning the hardware and architecture of the machine as well as programming information, links to other TI-59 pages on the net, etc. Please use the following links to navigate through this page:
|
| Basics | ||||||||
|
When the TI-59 was introduced in 1977 it was an instant hit and a very strong (in some vital points even superior) competitor to HP's flagship model of 1976/1977, the HP-67. Its price tag showed a remarkable 299.95 USD (remember, this was 1977, so although a reasonable price for a calculator like the TI-59, this was a lot of money). Display and keyboard: |
||||||||

|
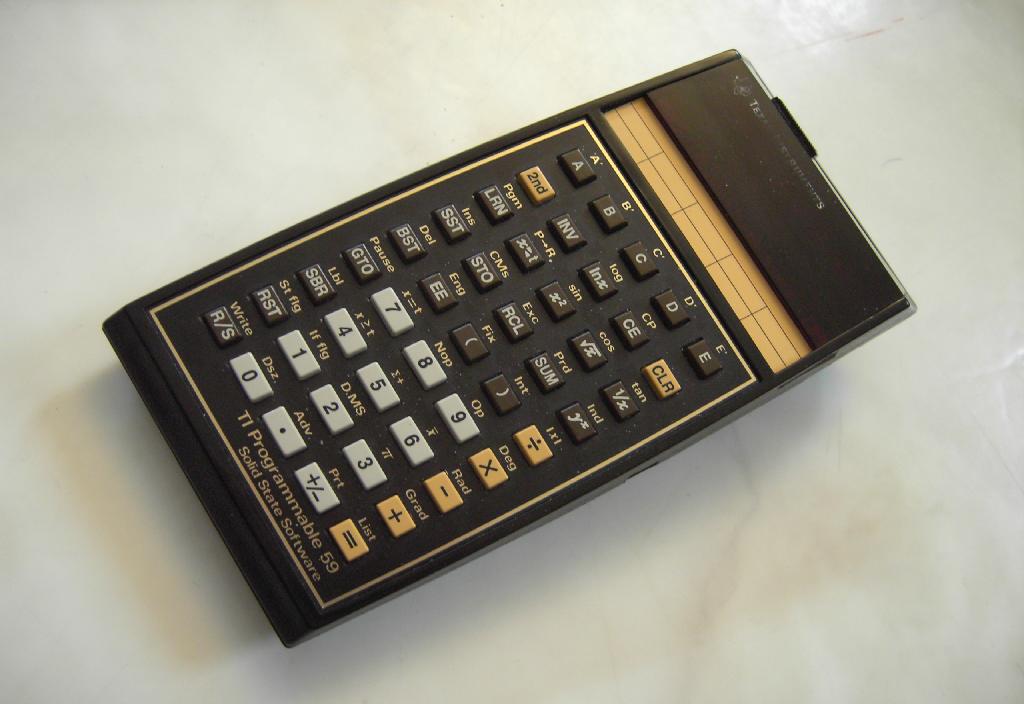
The TI-59 is the most powerful calculator having a LED seven segment display - all of its more powerful successors came with LC displays. The display of the TI-59 consists of 12 digits of which 10 are used to display a number (the internal precision is 13 digits). The leftmost digit displays a stylized "C" (as an abbreviation for "Calculating") when the calculator is actually performing a calculation. | |||||||
| The keyboard of the TI-59, shown in the picture on the right, contains 45 keys which allow access to way more than 100 different functions by using a shift key "2nd" and an inverse function key "INV". The latter proves to be very useful during actual calculations since it helps to avoid a cluttered keyboard with four and more functions per key as was not unusual on HP calculators. |

|
|||||||
|
When you have a look at the keyboard you will notice that there are keys for LN and LOG, but no keys denoted EXP or 10**X. These functions can be accessed using the corresponding LN/LOG keys by preceding those with the INV key, since EXP is the inverse function of LN, etc. ROM modules: |
||||||||
|
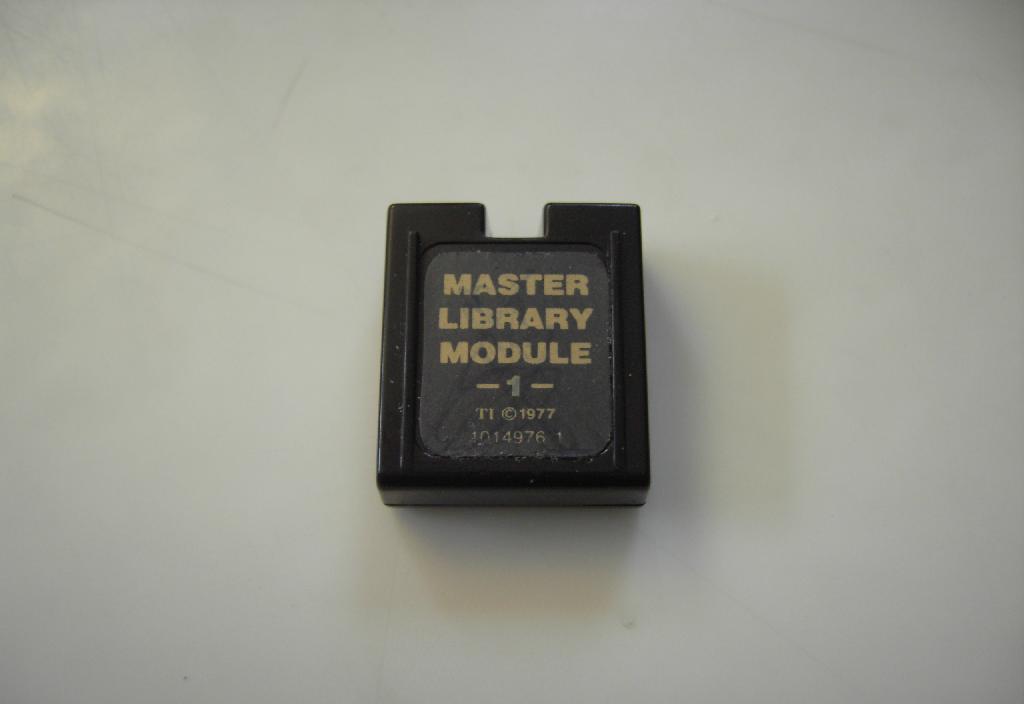
In addition to the extreme number of built-in functions, the TI-59 featured so called solid-state modules - exchangeable ROM modules which were placed in a special socket under a cover on the rear of the calculator. |
|||||||
|
Every calculator came with the so called "Master Library Module" which contained 25 preprogrammed programs for performing such different tasks as calculator diagnostics, complex number arithmetic, trigonometry, random number generation, statistical operations, calculation of days between dates, simple games, etc. These solid-state modules proved to be a key to the success of the TI-59 since there was quite a wide variety of modules - even some OEMs and other companies produced their own solid-state modules to make the TI-59 fit into their application niche. A wonderful example is the special ROM module developed for the United States Marine Corps to calculate takeoff, landing, etc. |
||||||||
|
In addition to that wealth of built-in functions and additional functions provided by exchangeable ROM modules, the TI-59 is a fully programmable calculator and supports conditional jumps, subroutine calls, indirect addressing, etc. ...everything a full fledged computer needs, so the possibilities of this calculator are nearly endless and only limited by your imagination, your creativity and the amount of available memory of the calculator. RAM: The main memory of the TI-59 consists of four integrated RAM circuits TMC0598 containing 1920 bits each, resulting in a total amount of memory of 960 bytes which was an incredible amount of RAM for a pocket calculator in 1977 and was about four times more than its competitor device, the HP-67 offered. (Its smaller cousin, the TI-58 had only half of this memory capacity.) The main memory is divided between an area reserved for program steps and an area for data memory cells. The initial setup of the calculator is 480 program steps and 60 data memories. One program step occupies one byte (or two nibbles which is more appropriate since the CPU of the TI-59 is a four bit processor TMC0501) while a single data memory occupies eight bytes (or 16 nibbles) - 13 digits for the mantissa, two digits for the exponent and one digit for the sign. |
||||||||
|
Magnetic cards: One of the most important features of the TI-59 is its built-in magnetic card (strip) reader/writer which allows to store 240 bytes on each of its two sides, so the total memory of a TI-59 can be stored on two magnetic cards and reread whenever necessary. This allows permanent program storage and encouraged a lot of people and companies to develop specialized programs and distribute them by means of prerecorded magnetic cards. |
|
|||||||
|
Power supply and batteries: Like most of its high priced competitors, the TI-59 got its electrical power from a custom rechargeable battery pack which mounted on the back of the calculator. Normally these battery packs allowed several hours of operation (depending on the number of card read/write operations), but due to the high power consumption of the calculator which exceeds 200 mA during card operations the battery packs normally degraded quite fast. Today it is nearly impossible to find a vintage battery pack in an operational state. If you find a calculator with a dead battery pack, remove it immediately but do not throw it away! You will need the custom plastic enclosure to build a replacement pack as will be shown in a following section. The rechargeable batteries required the use of an AC adapter - it is possible to run the calculator with the AC adapter only, but not recommended (the batteries are used to filter the ripple from the simple Graetz rectifier bridge in the calculator). If you have to do this, it is recommended to replace the batteries by a large electrolytic capacitor (about 1000 uF). (Please note that I do not take any responsibility for damage to your calculator, the AC adapter or yourself!) When running with AC adapter power only (i.e. the batteries are completely empty or have been removed) you can not read or write magnetic cards reliably or at all since the maximum output current of the AC adapter is too small for the rather huge currents drawn by the card reader. Such operations are only possible with charged batteries in place! Basic operations: The TI-59 features an input method called AOS (algebraic operating system) which allows the user to enter most calculations in the very same way they are normally written down. The TI-59 knows about operator precedence rules as well as it supports parentheses (up to six levels deep). So it is possible to enter
Some calculations require a value to be entered several times as in the following, simple example:
Some problems can be simplified by storing and retrieving values during a lengthy calculation. This can be done by using the STO and RCL functions of the TI-59. Both operations expect an address as their postfix operand (remember that the standard memory partition yields 60 data registers, numbered from 00 to 59). Typing STO 00 will store the value currently being displayed in the data register 00, while RCL 02 will recall the value previously stored in data register 02, etc. Using programs from library modules: As mentioned already, there is a plethora of useable programs stored in solid state modules which can be plugged into the calculator. Most (all?) of these programs can be used as stand alone programs although it is possible to use parts of these programs in user written programs (this will not be covered in the following). To run a program from an installed solid-state module you have to know its program number. Activating the program is then simply performed by entering
|
||||||||
| TI vs. HP or AOS vs. RPN | ||||||||
|
There is an ongoing and probably never ending debate between TI and HP proponents about the "ideal" way of operating a calculator. While TI people favor an algebraic input method like AOS, the HP fraction proposes the use of RPN (reverse polish notation). Both techniques have particular benefits and drawbacks and it is just a question of your personal liking which method you, personally, prefer. Although I have used HP calculators for many years and I even own quite a few of them (HP-25/28S/35/45/48GX) I still prefer the TI way of communicating with my calculator. It is not that I dislike HP or that I can not think the RPN-way (I did quite a lot of Forth when I was younger :-) ), it is just that the TI-59 is nearer to a conventional computer when it comes to programming than a HP calculator (this does not hold true when you think of old Burroughs mainframes or funny Forth processors as conventional computers). Let us have a look at a simple example: To calculate (2+3)*4 on a TI-59 all you have to do is to type in
|
||||||||
| Programming | ||||||||
|
Programming the TI-59 is very simple and straight forward: A TI-59 program consists of a number of steps you enter on the keyboard which will be repeated automatically at every program run. In addition to the normal keyboard functions found on more or less every advanced pocket calculator, the TI-59 has provisions for conditional and unconditional branching and subroutine calling, etc. Entering programs: |
||||||||

|
To write a program you have to enter the learn mode by pressing the LRN key. This will result in a display as shown on the left. The three leftmost digits show the current address where the instruction to be entered will be stored while the two rightmost digits show the decimal instruction code currently stored at this memory location. | |||||||
|
Let us write a simple example program which will increment a given number by 1 in an endless loop and display the resulting values. If this problem had to be solved manually you might enter a command sequence like
Now the stage is set to run the counting program. After pressing RST the program counter contains 000 and execution of the program can be started by pressing R/S (run/stop). The programm will now run until you press R/S again. Of course, this program is very crude. The main objection is the use of the RST instruction to repeat the loop. If this were the only way to affect the program counter, the programming capabilities of the TI-59 would be severely restricted. Normally RST is not used to control the overall program flow, instead unconditional and conditional jumps (GTO) are used to implement loops, etc. Using GTO an enhanced version of the program may look like this:
A production program will normally not use labels as the destination of GTO or SBR (subroutine call) instructions. But labels can still be very useful to control a program: The top row of keys on the TI-59 is denoted by the letters A to E and A' to E' - these can be used to jump to a label with a corresponding name by merely pressing the desired key! So a program containing more than one entry point does not have to be started by pressing R/S (which will continue operation at the location the program pointer currently points to) - instead its different entry points can be activated by using the aforementioned keys. All programs in the master library module make frequent use of this technique. Working with magnetic cards Using the built-in card reader/writer it is possible to store programs on magnetic cards with the option of reading them into memory anytime they will be needed. A magnetic card has two sides each capable of storing 240 bytes while the complete main memory of the TI-59 is 960 bytes in size. So two cards are necessary to backup the complete memory contents of the calculator. Shorter programs will only require half of a card or one card, depending on their size. To write a card, you have to enter the number of the memory bank to be written to the card (ranging from 1 to 4) and press 2nd WRITE. The calculator will then display a faint "C" in the left most digit and wait for a card being inserted into the card reader/writer. After writing the card, the display will either show the number of the memory bank (in this case the write operation was successful) or display a blinking value indicating an unsuccessful write operation. Reading a card is simpler - just make sure that the display register contains the value 0 and insert a prerecorded card into the card reader/writer. After reading the card successfully the display will show the number of the bank which was copied to memory. (It is possible to redirect card contents to different banks than they were recorded from - more information about this can be found in the user manual of the TI-59). Example programs The following section contains some example programs (only one, currently), most of which have been written by me. Please do not expect works of art - there are always ways to save time or program space - these programs were written just for fun and mostly at very late night. :-)
|
||||||||
| Technology and packaging | ||||||||
|
System overview |
||||||||
|
|
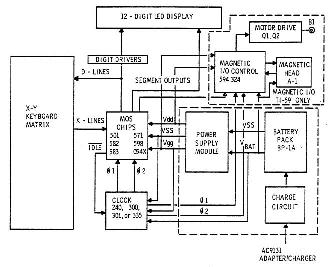
The picture on the left is copied from the "TI58/59 Service Manual", page 2 and gives an impression of the overall architecture of the calculator. The heart of the machine is a 4 bit TMC0501 processor surrounded by four RAM ICs of 1920 bits each, two ROM and support logic chips, an interface chip for the card reader/writer, the necessary clock circuitry and a switching power supply generating three MOS compatible voltages. |
|||||||
|
Dissecting a TI-59 The following pictures show the dissection of a TI-59 which was performed on a rather battered unit I acquired at an online auction. It had a battery pack which was leaking for many years resulting in severe deposits of battery chemicals on the printed circuit board, etc. Should you ever attempt to repair a TI-59 please keep in mind that it is based on very sensitive MOS devices, so be sure to work in an ESD safe place! Always wear an earthed wrist strap and use a conductive work mat connected to earth, too. Do not attempt to open your calculator unless you are experienced with working with MOS devices! |
||||||||
|
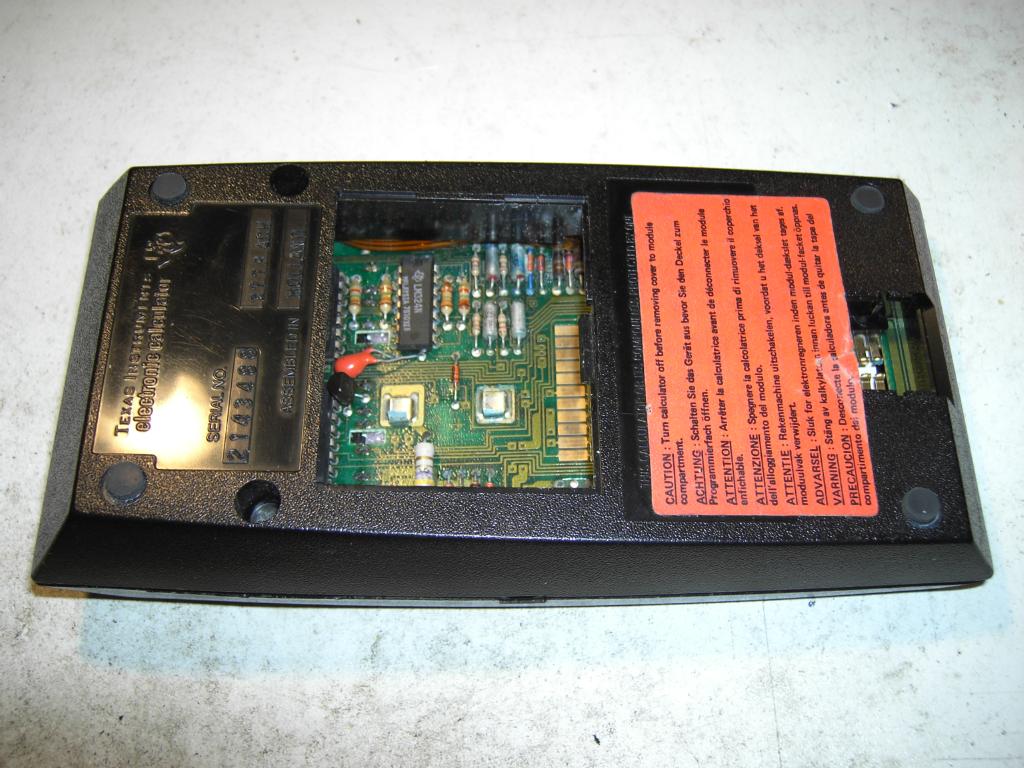
The picture on the left shows the back of the TI-59 with its battery pack and the solid state ROM module already removed - both steps are necessary prior to opening the case. To open the calculator remove boths screws on top of the back side, then slide the back gently down towards the ROM module socket until it comes free. |
|||||||
|
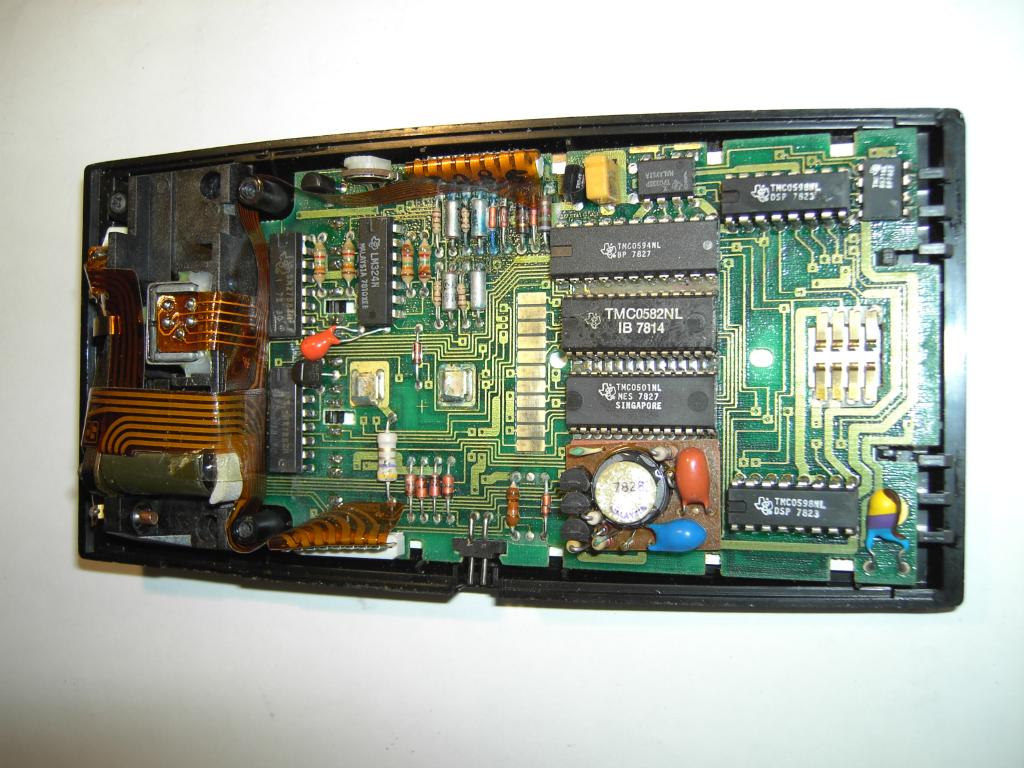
The picture on the right shows the interior of the calculator. (Note the blue discoloration due to debris from the deteriorated battery pack! These residues can be conductive and can cause all kind of trouble, so you have to carefully remove them.) |
|
|||||||
|
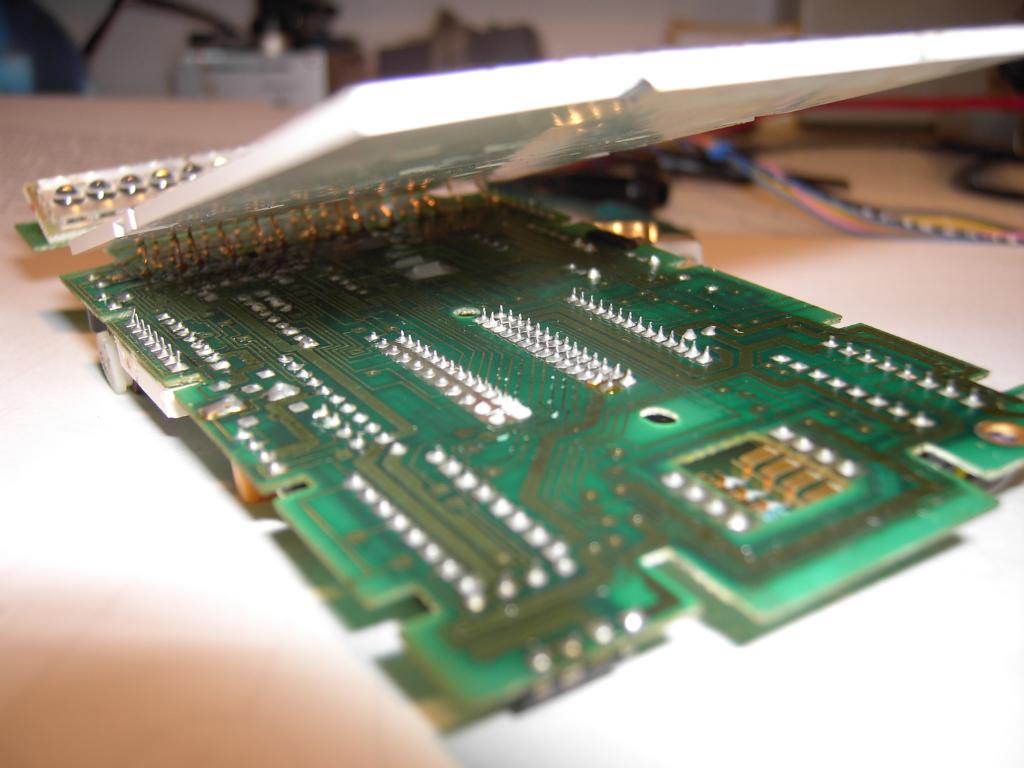
All in all there are 13 integrated circuits in the TI-59 - I doubt that any other pocket calculator can top this - not to mention the quite large amount of discrete electronics for the card reader/writer etc. |
||||||||
|
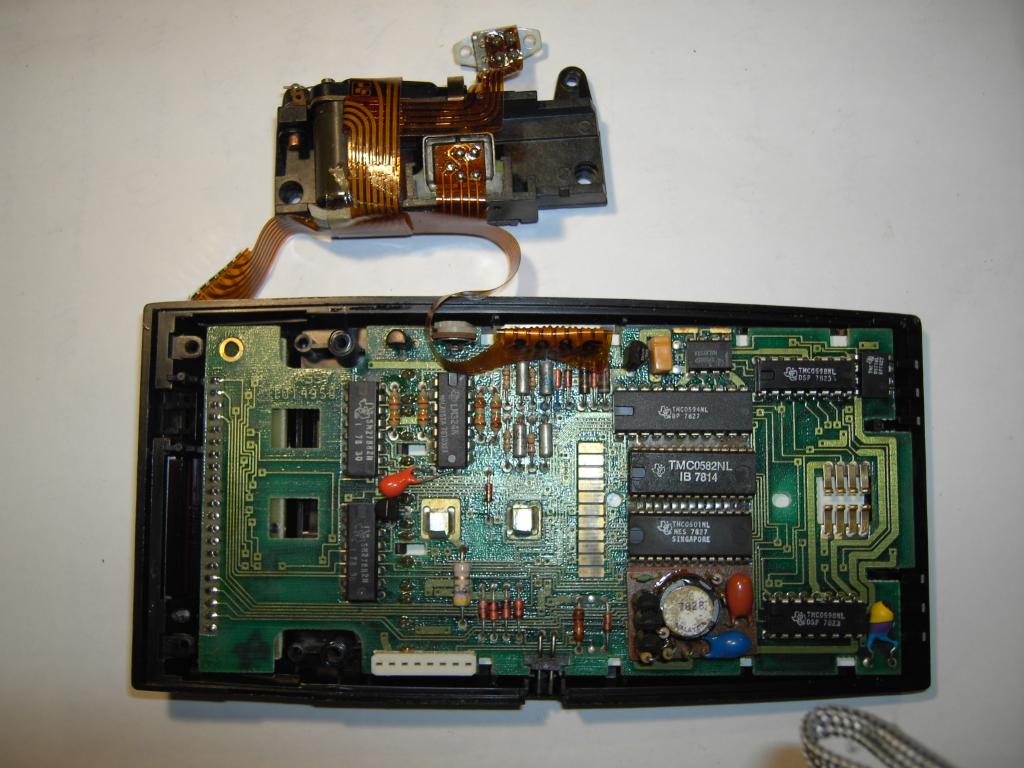
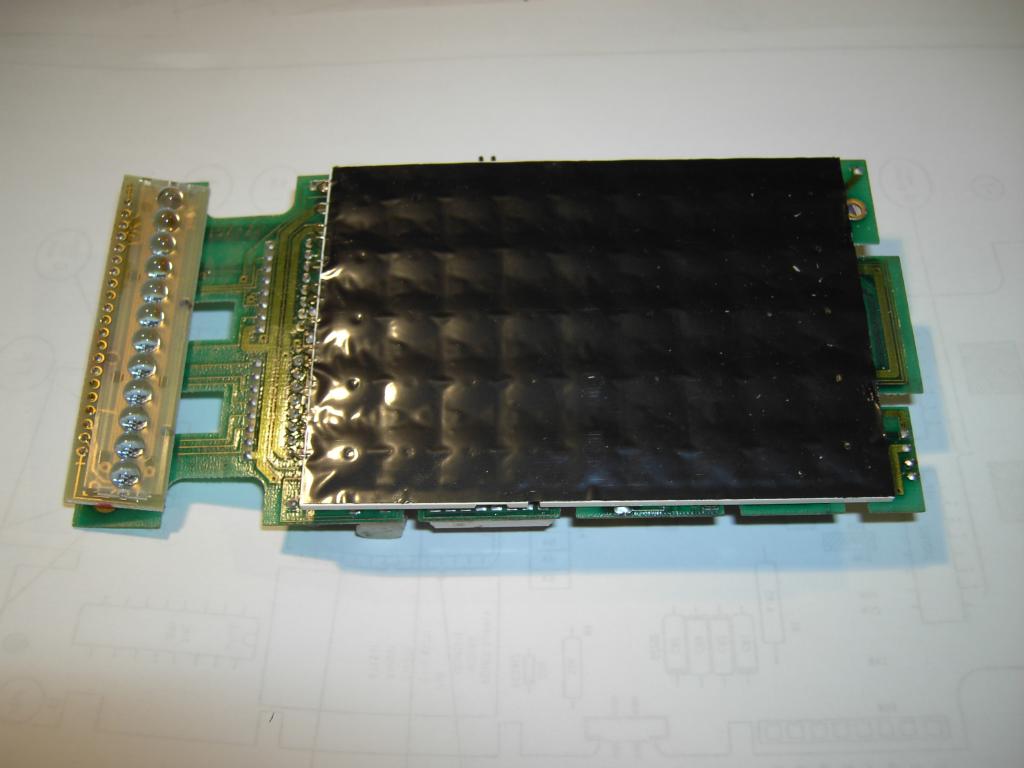
The picture on the left shows the interior of the calculator with the card reader/writer removed. Be careful not to bend the flexible connection wires when disconnecting them - this is a delicate procedure and requires some patience. :-) The row of soldering points on the far left connects the 12 digit display with the main printed circuit board. |
|||||||
|
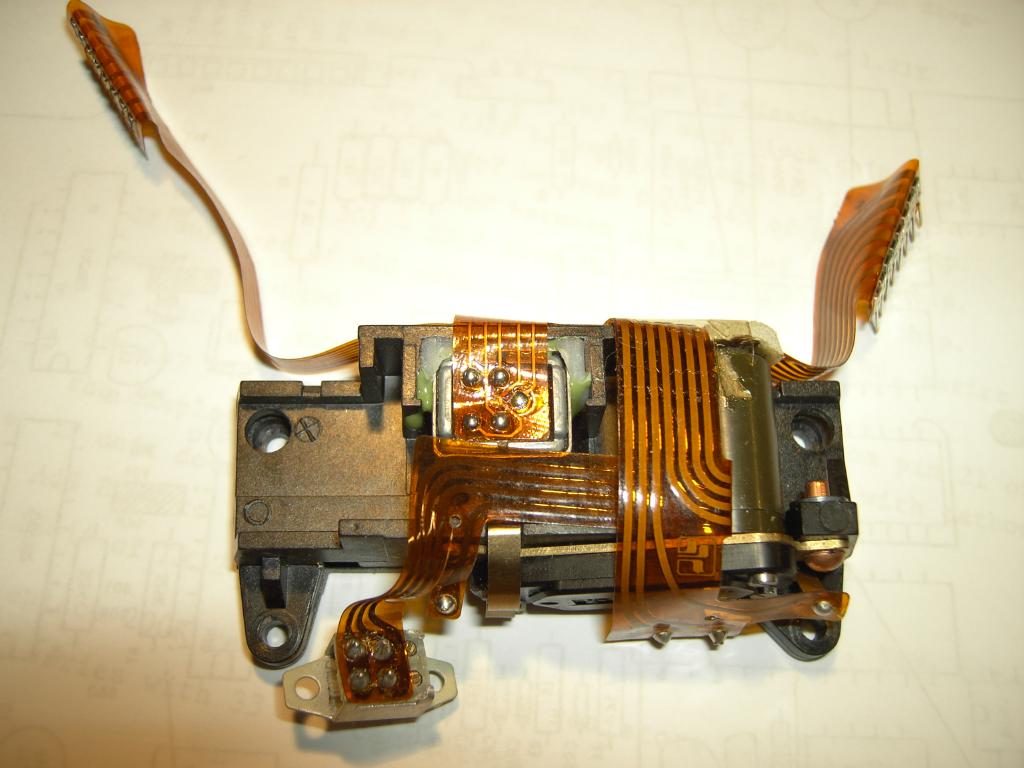
On the right the card reader/writer module can be seen. On the bottom left is the power switch, in the middle of the picture the four track read/write head is visible. The other contacts belong to the two card sense switches. |
|
|||||||
|
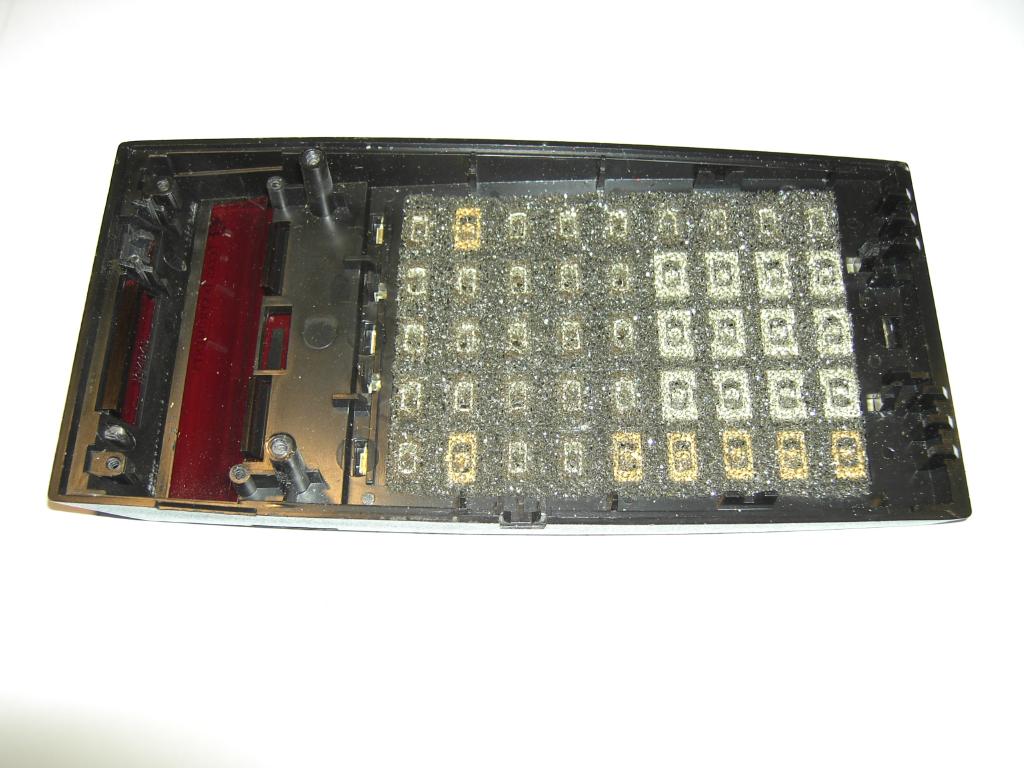
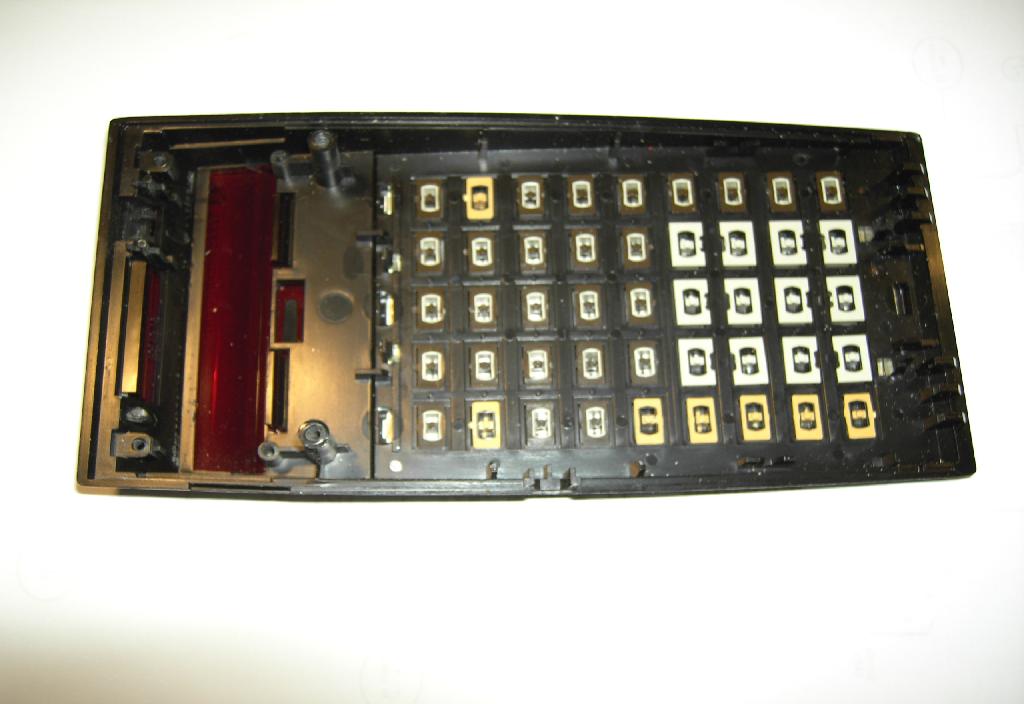
The two following pictures show the back of the keys after removing the main printed circuit board with the keyboard attached to it. Be very (very!) careful not to shuffle the keys or even loose a key. Removing the foam rubber pad is delicate since the keys will stick to it! When you encounter bad key response you can try to replace this foam rubber pad. |
||||||||
|
|
|||||||
|
The picture on the left shows the extracted main board with the keyboard attached. Do not attempt to remove the plastic sheet from the keyboard (do not even think about it). The whole contraption is quite fragile, so be very careful. |
|||||||
|
When you have severe keyboard problems, i.e. the keys do not really "click" but feel like marmelade instead when pressing them, you can try to insert a thin sheet of (slightly conductive) rubber foam between the printed circuit board and the keyboard. This is a delicate procedure but worked fine for me in two instances. |
|
|||||||
| Replacing old battery packs | ||||||||

|
Most vintage battery packs have deteriorated during the last up to 30 years. The pack shown on the left is an actual example from a TI-59 I acquired at an online auction. I already removed it from its custom plastic enclosure. (Be careful at operations like these since the residue on the batteries is toxic and corrosive!) Please note that (as always) I will not take any responsibility for any damage or injury which might result from attempts to perform any repairs and/or changes on your calculator, battery pack, etc.! |
|||||||
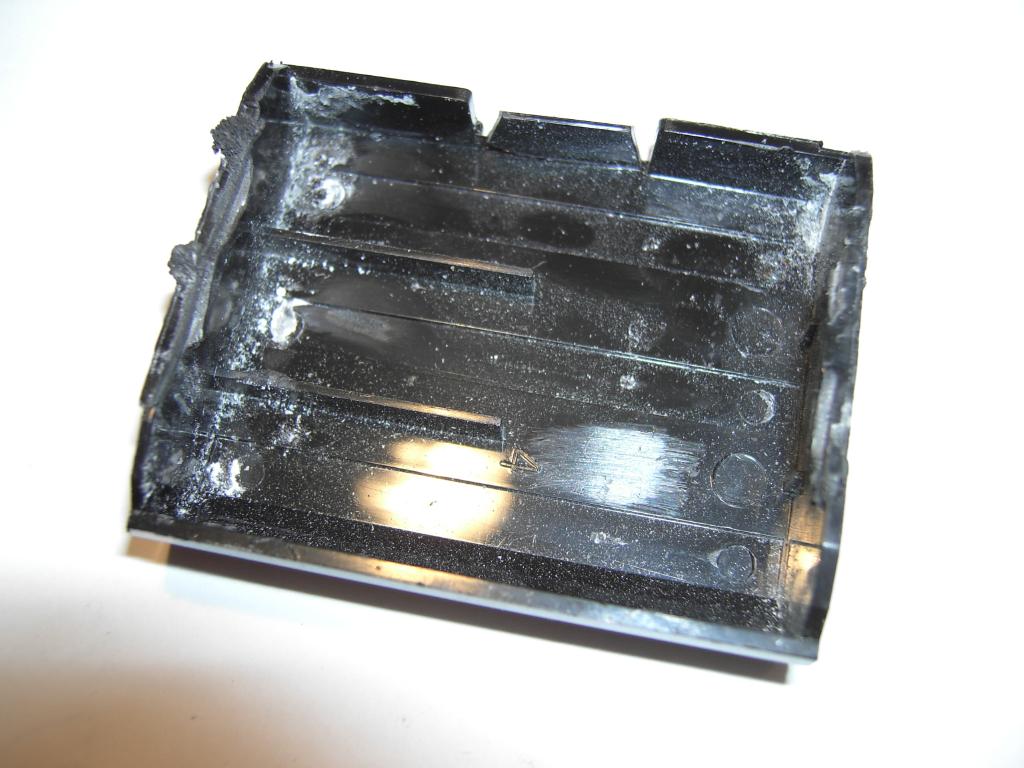
|
The picture on the right shows the now empty plastic battery holder without the two center restrainers which I had to cut to remove the original batteries. This enclosure will be used as a housing for a more modern NiMH battery pack with 2300 mA/h thus making up to ten hours and more of continuous operation of the TI-59 possible. |
|
|||||||
|
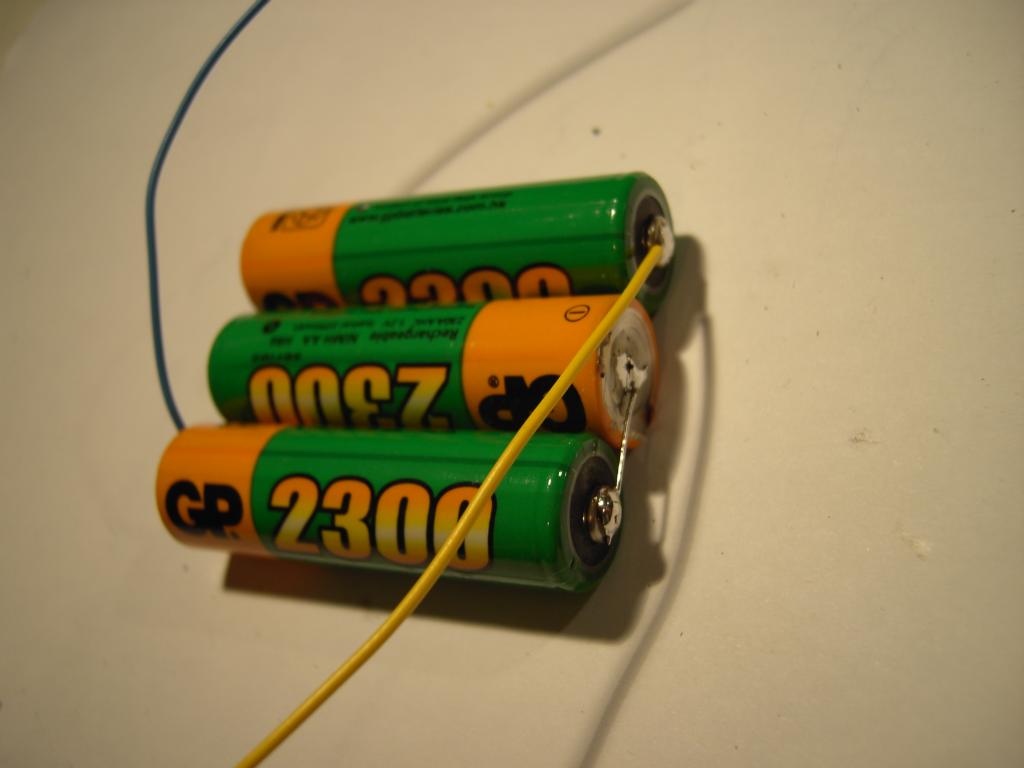
The replacement batteries are shown on the left - when you join these batteries be careful not to short them! 2300 mA/h is quite a lot of energy and you will at least need a new battery after such an accident. Be sure to tape the ends of the wires to avoid accidentally touching anything you would not like to touch (other batteries, your calculator's internals, etc.). |
|||||||
|
The picture on the right finally shows the new battery set installed in the custom enclosure. Since the TI-59 I bought had already broken contact fingers I decided to solder the wires directly to the appropriate contacts on the printed circuit board. A more careful restauration approach would require to salvage the contact pads from the original battery pack! |

|
|||||||
|
Using this battery pack my TI-59 can run for more than 10 hours on a continuous base - even at the end of this time span the batteries can supply enough current to reliably power the card reader/writer. Due to the very simple charging circuit (which, in effect, consists only of a series resistor) it takes about 15 hours to load this battery pack from a nearly empty state to full capacity! |
||||||||
| Buying a TI-59 | ||||||||
|
From time to time a TI-59 turns up at local flea markets or at online auctions. There might be some things to keep in mind before and while buying such a calculator:
|
||||||||
| Other resources on the net | ||||||||
|
|
||||||||